Get your Supabase on: Adding Auth to your iOS app with Supabase-Swift
Supabase is known as one of Firebase’s alternatives. In this article, we’ll learn how to implement it in an iOS app.

Intro
To clarify, this article is aimed at people who are already familiar with Supabase but are facing difficulties implementing it on Apple platforms using SwiftUI or UIKit due to the lack of documentation on this topic.
Currently, Supabase does not provide a client library for Swift applications. Although Supabase allows us to access the database using standard HTTP protocols, it is not the easiest way and we will not discuss it here.
Fortunately, a third party has already created a Supabase client library for Swift called supabase-swift (thanks to the Supabase community 🤘). In their Readme.md file, they claim that this library is used with the same approach as Supabase for JavaScript (I assume this statement was made to avoid being chased for proper documentation, lol).
Hands-on…
Well, without any further do, let’s get started with the example project to understand how to use the Supabase library in Swift.
Scope of work that we’ll undertake: So for this time we’re just gonna use Supabase Auth’s email provider without the email confirmation.
At the end of the article, we’ll take things to the next level by sending user metadata whenever a new user signs up and gets added to the Profiles table that was created by ourselves.
Create a new Supabase project
We won’t dive into the nitty-gritty of creating a new project on Supabase, but once you’ve got that down, there are a couple of things you gotta grab — your Supabase URL and API Key.
Just head over to Project Settings > API and you’ll find them there: the Project URL and Project API Keys (anon, public). Don’t forget to keep these because we’ll need them for our Swift App to connect to this Supabase project.

We don’t need to create any new tables in this section, but we require only the User table that Supabase already provides.
Add dependency to our Xcode project
Now we go to the Xcode. The first step after creating a project in Xcode is to add the supabase-swift package to the project. Anyway, for this case we’ll be using Swift Package Manager.
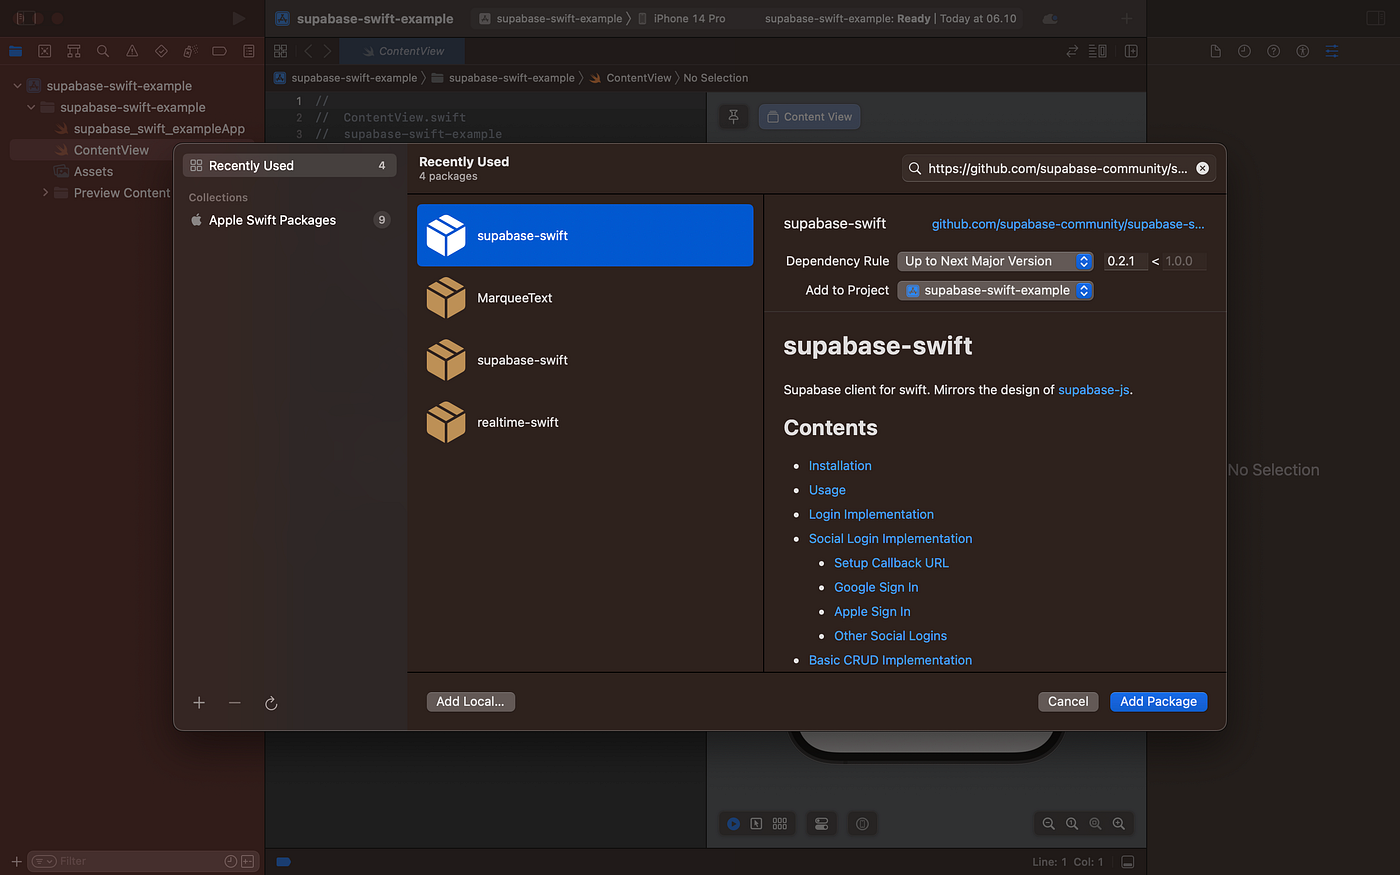
Steps: 1. click “File” > 2. click “Add Package” > 3. type the URL: https://github.com/supabase-community/supabase-swift at search 🔍, click Enter key and select the right package > 4. click “Add Package” button at the bottom > 5. choose Package Product > 6. click “Add Package”. Finished.
Create a service class and import Supabase
Next, we create a Swift file that will contain the Auth service in our project. Import Supabase into the file and create a class called AuthService.
//
//  AuthService.swift
//  supabase-swift-example
//

import Foundation
import Supabase

class AuthService {
    // Your codes here...
}
After that, we have to create a global property of AuthService class for SupabaseClient. Next, we will initialize SupabaseClient with Supabase Project URL and Project API Key mentioned before in the class’s initializer method.
//
//  AuthService.swift
//  supabase-swift-example
//

import Foundation
import Supabase

class AuthService {
    let client: SupabaseClient

    init(config: AppConfiguration) {
        client = SupabaseClient(supabaseURL: [YOUR SUPABASE PROJECT URL],
                                supabaseKey: [YOUR SUPABASE API KEY])
    }
}
Define the method to register a new user
In the AuthService class, we create a new method to serve user registration.
func register(email: String, password: String, completion: @escaping (_ isSucceed: Bool, _ error: Error?) -> Void) async {
    do {
        try await client.auth.signUp(email: email, password: password)
        completion(true, nil)
    } catch {
        print("Failed to register. \(error.localizedDescription)")
        completion(false, error)
    }
}
Additional: Send metadata when the user registers.
In most cases, we have to store other data (e.g. user’s full name, birthday) when a user registers for the first time in our application. We can handle this metadata in a Supabase trigger function.
Indeed, this article doesn’t delve into setting up the Supabase server. Now, let’s address the query: How do we transmit metadata from the client side?
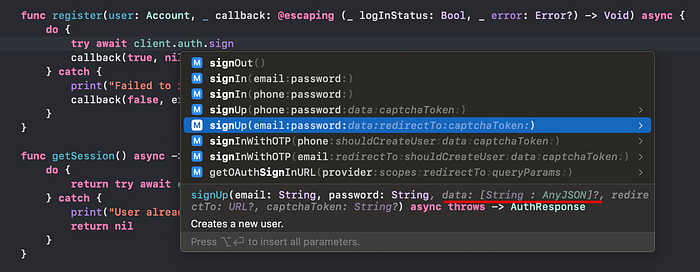
In the auth.signUp method of the Supabase client, as shown in the image above, there is an optional parameter named data with the type [String : AnyJSON]?. We can send data to the Supabase server through this data parameter.
AnyJSONis an enum provided by GoTrue, which is the user management and authentication library used by Supabase. We can assign a value from a specific data type by selecting the appropriate enum case. For example, in the code below, for the String data type, we can use the enum case.string(String).
In this example, we will send the user’s full name, so the code will look like the following.
try await client.auth.signUp(email: user.email,
                             password: user.password,
                             data: [
                               "fullname" : .string(user.fullname),
                             ])
Due to our use of the “fullname” key in the metadata sent by the client, we need to handle the same key on the server side. In this case, we can access the “fullname” metadata using the trigger parameter new.raw_user_meta_data->>'fullname' in Supabase server.
There you go — setting up authentication in your Swift-powered iOS app with Supabase is a breeze. Supabase, the cool Firebase alternative, is your companion, and this guide is here to help you conquer SwiftUI or UIKit challenges. Big thanks to supabase-swift and the awesome community behind it.
